Don’t forget to click the Save Policy button after making any changes in each section of the Policies tab to ensure your adjustments take effect.
By default, we recommend implementing the following settings for newly created policies to establish a strong foundation for your organization's online security and content filtering.
These settings aim to protect users from online threats and ensure compliance with organizational standards. Consistently assess and modify these settings to stay in tune with your organization’s evolving requirements and the shifting landscape of online threats.
tl;dr Recommended Settings
- Categories
- Block Security, Adult Content and Drugs & Alcohol
- Geolocation
- Block Russia, China, Iran, Nigeria, North Korea (Democratic People's Republic of), Belarus
- Allow (if Zero Trust) United States, Canada, United Kingdom, Ireland, France, Germany, Australia
- Settings
- Check Full URL Filtering
- Uncheck Risk Level Access
- Options Force Safe Search; Force YouTube Restricted Mode
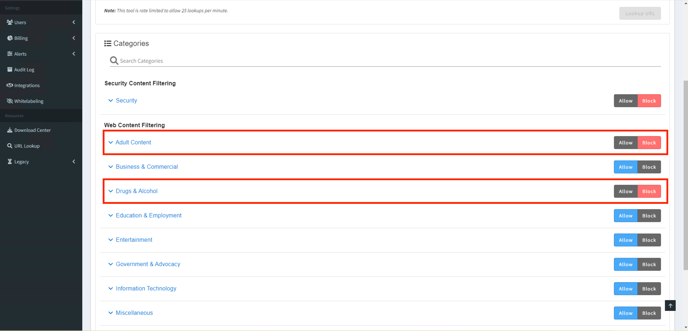
Categories
- Set the Security category to "Block." This setting is crucial for protecting users from a range of online threats, such as spam, phishing attacks, malware, compromised websites, and botnets, among others.

- Set the categories for Drugs & Alcohol and Adult Content to "Block." Blocking these categories reduces the risk of harmful behavior and ensures compliance with content appropriateness policies.
Settings
- Check Full URL Filtering
-
This feature ensures comprehensive protection by scanning full URLs and their parameters in real-time to detect hidden threats within trusted domains or subdomains, proactively blocking malicious links. It monitors and filters direct IP connections that bypass DNS to prevent unauthorized access and detect suspicious traffic. Additionally, it analyzes downloaded files for malware or phishing indicators, blocking harmful files before execution to safeguard users from potential threats
-

- Keep the Risk Level Access setting Unchecked.
- This setting is primarily intended for highly secure environments, such as those following zero-trust principles, medical laboratories, or kiosks. Activating it may inadvertently restrict access to screen sharing and remote desktop applications, as well as impact DNS resolution. Therefore, it is advisable to enable this option only after whitelisting dns.google.com and cloudflare-dns.com (or any other DNS resolver you may be using) in the "Websites" tab. This precaution is necessary because the Risk Level Access reputation filter might otherwise block these addresses, preventing successful DNS resolution on user endpoints.

You can choose to enable the Safe Search feature, which helps filter out explicit content from search results on platforms like Google, Bing, and DuckDuckGo. This feature is optional and can be tailored to meet specific use cases and user preferences.

After applying the recommended settings, you can customize your policy based on your specific needs and what you want users to be able to access.
Understanding Policy Settings
In this section, we will explore the various components of the Policies tab. We aim to provide clear examples and explanations to help you grasp the rationale behind selecting specific settings. By understanding these selections, you can effectively enhance your organization's security and compliance measures.
Categories
This part of the Policies tab allows you to manage the content categories that users can access. You have the flexibility to either Allow or Block entire categories, as well as any of the associated sub-categories within them. This functionality enables you to tailor access according to your organization’s content policies and user needs.
Websites
The Websites section of the Policies tab provides you with the ability to manage specific domains by adding them to either an Allow list or a Block list. This functionality allows the domains you specify to take precedence over the broader content categories you have configured in the Categories section. By using this feature, you can fine-tune user access to particular websites, ensuring that you grant or restrict access to specific sites without resorting to blanket blocks on entire domains.


You can also upload a .csv file to manage your safe and block lists. To do this, click the "CSV" button located next to "Add URL," then select "Add URLs w/CSV." This will prompt you to choose the file you wish to upload, allowing for efficient bulk management of your specified domains.

Here's an example of how to format your .csv files:

Mode refers to including or excluding subdomains. True = include, False = exclude subdomains.
Here is an example of the appropriate format for uploading the .csv file mentioned above:

Geolocation
This feature within the Policies section enables you to manage access to websites based on their geographic location as determined by IP address. For instance, if you wish to restrict users from accessing websites based in Russia, you can select the "Block" option and include the "Russian Federation" in your list of Blocked Countries.
It is important to note that blocking a country does not guarantee that all related domains will be inaccessible. For example, domains with extensions like .ru for the Russian Federation may still be reachable, as top-level domains can occasionally resolve to IP addresses that are located outside the designated region.
Blocked Countries Best Practices:
- Russia
- China
- Iran
- Nigeria
- North Korea (Democratic People's Republic of)
- Belarus
Allowed Countries Best Practices:
- United States
- Canada
- United Kingdom
- Ireland
- France
- Germany
- Australia
